
In this hands-on article, we will explore the interoperability testing of MPLS L3VPN between IP Infusion OcNOS and Cisco tested on GNS3.
In our previous article, “Configuring MPLS L3VPN on IP Infusion OcNOS,” we provided a comprehensive explanation of MPLS, including its necessity and the associated protocols.
Testbed & Image Version
- GNS3
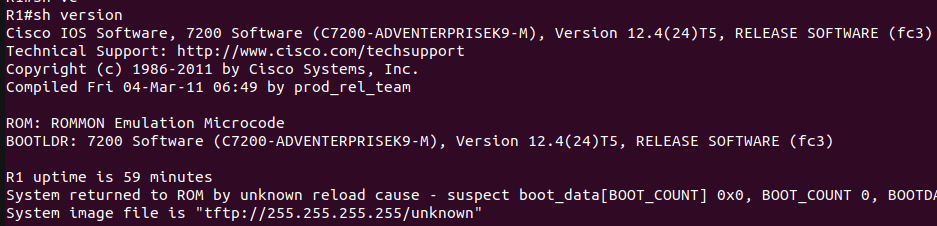
- Cisco IOS (7200)
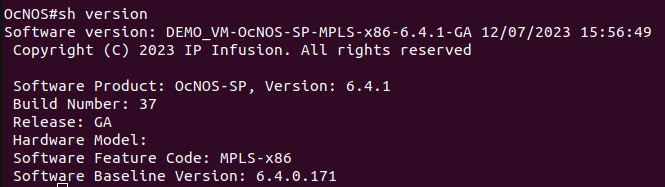
- OcNOS (x86-6.4.1)
Cisco Version
OcNOS Version
Topology

In above topology, the status of each device is given below:
| Devices | Status |
|---|---|
| OcNOS-1 & OcNOS-4 | Provider Edge Routers |
| R1 & R2 (Cisco) | Provider Routers |
| PC1 & PC2 | Customer Edge Devices |
Steps to configure MPLS L3VPN
- Configure OSPF
- Enable LDP on routers
- Create VRFs
- Configure BGP VPNv4
We start by allocating IP addresses to the network interfaces of the routers. Subsequently, OSPF is activated on the routers (we’ll operate within a single OSPF area).
Following this, each router must share information about its networks with other routers. This is achieved using the “network” command, specifying the IP address, subnet mask of the network, and the OSPF area to which the network belongs.
Configuration on OcNOS-1:
OcNOS-1(config)#router ospf 10
OcNOS-1(config-router)#router-id 1.1.1.1
OcNOS-1(config-router)#network 192.168.10.0/24 area 0
OcNOS-1(config-router)#network 192.168.12.0/24 area 0
OcNOS-1(config-router)#network 1.1.1.1/32 area 0
Configuration on R-1:
R1(config)#router ospf 10
R1(config-router)#router-id 2.2.2.2
R1(config-router)#network 192.168.10.0 255.255.255.0 area 0
R1(config-router)#network 192.168.11.0 255.255.255.0 area 0
R1(config-router)#network 2.2.2.2 255.255.255.255 area 0
Configuration on OcNOS-4:
OcNOS-4(config)#router ospf 10
OcNOS-4(config-router)#router-id 4.4.4.4
OcNOS-4(config-router)#network 192.168.11.0/24 area 0
OcNOS-4(config-router)#network 192.168.13.0/24 area 0
OcNOS-4(config-router)#network 4.4.4.4/32 area 0
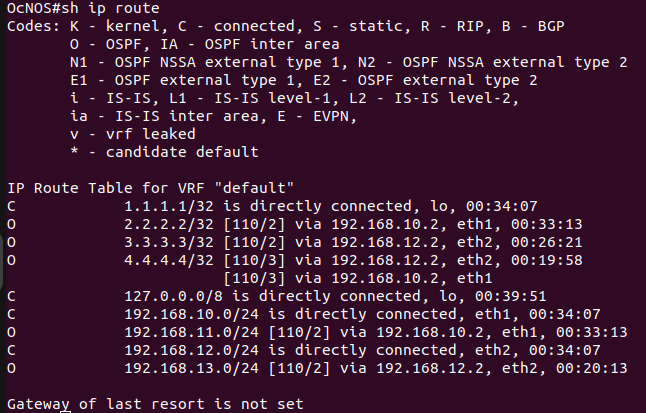
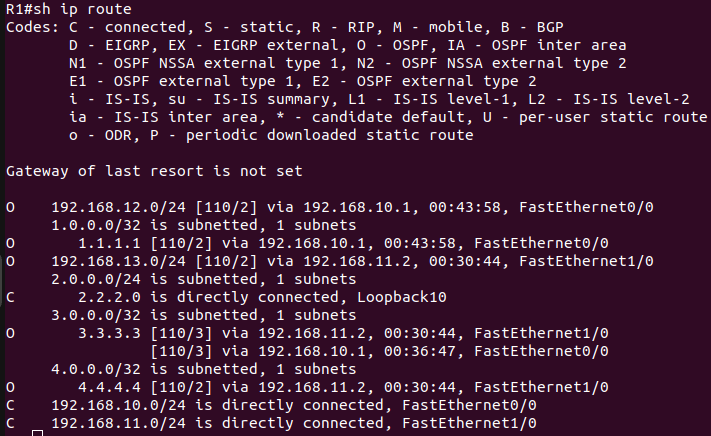
After configuring OSPF, verify its status. The figures below are of OcNOS-1 & R-1 and clearly depicts that OSPF is successfully configured.
Since OSPF is running properly, it’s time to move on to the next step and configure LDP for the topology.
To configure LDP, we first need to enable LDP on the router, configure the router ID, configure the LDP transport address and enable label switching on the interfaces.
It is common practice to use a loopback interface as the router ID. The transport address is the IP address used for creating the TCP session between neighboring routers. It is important that the transport-address is reachable by other routers.
Configuration on OcNOS-1:
OcNOS-1(config)#router ldp
OcNOS-1(config-router)#router-id 1.1.1.1
OcNOS-1(config-router)#transport-address ipv4 1.1.1.1
OcNOS-1(config-router)#exit


OcNOS-1(config)#interface eth1
OcNOS-1(config-if)#label-switching
OcNOS-1(config-if)#enable-ldp ipv4
OcNOS-1(config-if)#exit


OcNOS-1(config)#interface eth2
OcNOS-1(config-if)#label-switching
OcNOS-1(config-if)#enable-ldp ipv4
OcNOS-1(config-if)#commit
Configuration on R1:
R1(config)#mpls label protocol ldp
R1(config)#interface f0/0
R1(config-if)#mpls ip
R1(config-if)#interface f1/0
R1(config-if)#mpls ip
Configuration on R2:
R2(config)#mpls label protocol ldp
R2(config)#interface f0/0
R2(config-if)#mpls ip
R2(config-if)#interface f1/0
R2(config-if)#mpls ip
Configuration on OcNOS-4:
OcNOS4(config)#router ldp
OcNOS4(config-router)#router-id 4.4.4.4
OcNOS4(config-router)#transport-address ipv4 4.4.4.4
OcNOS4(config-router)#exit


OcNOS4(config)#interface eth1
OcNOS4(config-if)#label-switching
OcNOS4(config-if)#enable-ldp ipv4
OcNOS4(config-if)#exit


OcNOS4(config)#interface eth2
OcNOS4(config-if)#label-switching
OcNOS4(config-if)#enable-ldp ipv4
OcNOS4(config-if)#commit
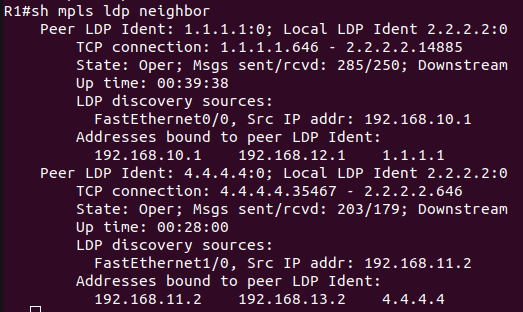
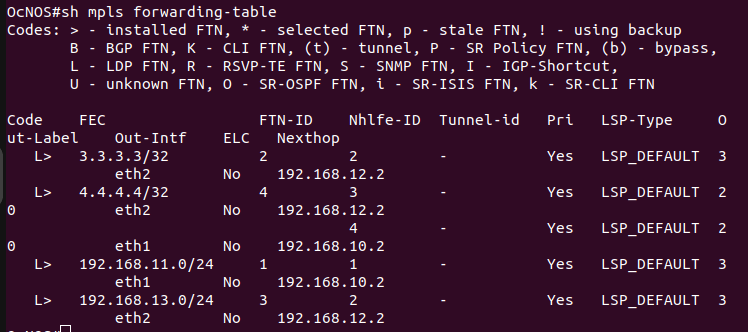
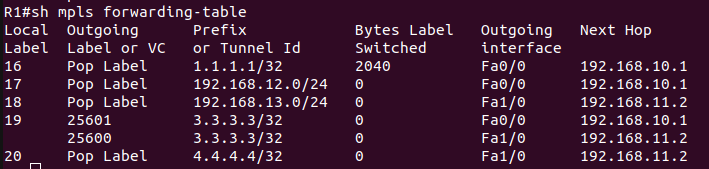
LDP configurations can be verified by using the following commands:
show mpls ldp neighbor – Displays the list of LDP neighbors that the router has established adjacency with.
show mpls forwarding-table – display the MPLS forwarding table. It shows the mapping between MPLS labels and network prefixes, as well as the outgoing label and interface and the next hop.

After completing MPLS LDP, now move towards the L3VPN configuration.
Layer 3 Virtual Private Network (L3VPN) is a solution allowing companies to securely link distant sites through a common IP framework. It’s commonly employed by enterprises spanning various locations, like service providers, data centers, branch offices, and remote employees, ensuring secure and effective access to corporate assets.
Now create the VRFs and associate interfaces to those VRFs. Each PE router in the MPLS-VPN backbone is attached to a site that receives routes from a specific VPN, so the PE router must have the relevant VRF configuration for that VPN.
Configuration on OcNOS-1:
OcNOS-1(config)#ip vrf red
OcNOS-1(config-vrf)#rd 1.1.1.1:4
OcNOS-1(config-vrf)#route-target both 100:4
OcNOS-1(config-vrf)#exit


OcNOS-1(config)#interface eth3
OcNOS-1(config-if)#ip vrf forwarding red
OcNOS-1(config-if)#ip address 192.168.14.1/24
Configuration on OcNOS-4:
OcNOS-4(config)#ip vrf blue
OcNOS-4(config-vrf)#rd 4.4.4.4:4
OcNOS-4(config-vrf)#route-target both 100:4
OcNOS-4(config-vrf)#exit


OcNOS-4(config)#interface eth3
OcNOS-4(config-if)#ip vrf forwarding blue
OcNOS-4(config-if)#ip address 192.168.15.1/24
OcNOS-4(config-if)#commit
Next, we need to configure BGP VPNv4 between the two PEs.
BGP enables the exchange of routing information between networks, allowing the PE routers to share information about customer routes and VPN labels. This information exchange is necessary for the proper routing of customer traffic across the VPN.
Configuration on OcNOS-1:
OcNOS1(config)#router bgp 65000
OcNOS1(config-router)#neighbor 4.4.4.4 remote-as 65000
OcNOS1(config-router)#neighbor 4.4.4.4 update-source 1.1.1.1


OcNOS1(config-router)#address-family vpnv4 unicast
OcNOS1(config-router-af)#neighbor 4.4.4.4 activate
OcNOS1(config-router-af)#exit


OcNOS1(config-router)#address-family ipv4 vrf red
OcNOS1(config-router-af)#redistribute connected
OcNOS1(config-router-af)#commit
Configuration on OcNOS-4:
OcNOS4(config)#router bgp 65000
OcNOS4(config-router)#neighbor 1.1.1.1 remote-as 65000
OcNOS4(config-router)#neighbor 1.1.1.1 update-source 4.4.4.4


OcNOS4(config-router)#address-family vpnv4 unicast
OcNOS4(config-router-af)#neighbor 1.1.1.1 activate
OcNOS4(config-router-af)#exit


OcNOS4(config-router)#address-family ipv4 vrf blue
OcNOS4(config-router-af)#redistribute connected
OcNOS4(config-router-af)#commit
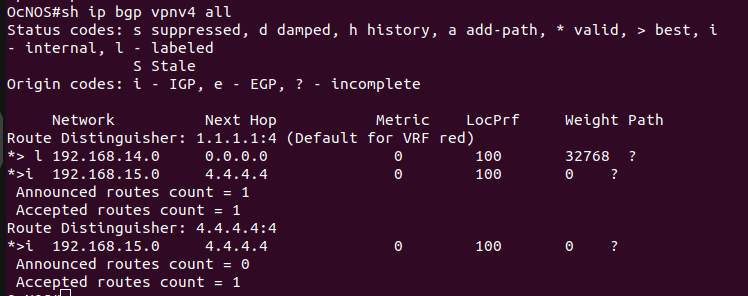
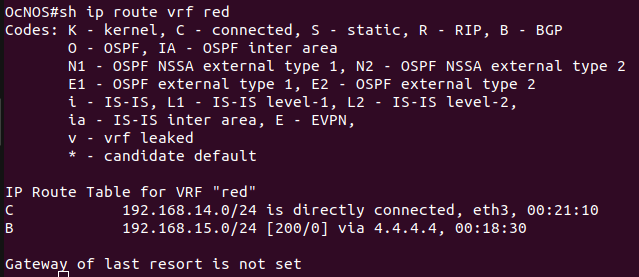
Since all the steps have been completed, now verify L3VPN configuration by using the following commands:
show ip bgp vpnv4 all – Displays the BGP routing table for VPNv4 address family, which shows the learned VPNv4 routes and associated BGP next-hops.
Show mpls vrf-forwarding-table vrf red – display the MPLS VPN forwarding table for the VRF instance “red”.

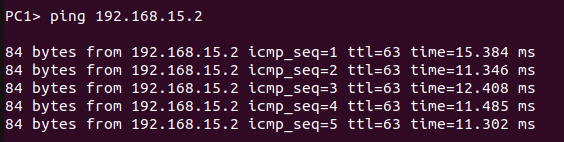
The figure below shows the successful ping from PC1 to PC2.
I hope you found this article engaging, and if you have any queries or feedback, feel free to share them with us.
About Hardware Nation:
Hardware Nation is a professional services company that accelerates network transformation through an open networking approach, enabling freedom of choice, flexibility, and cost efficiency. Our seasoned experts have worked on projects for some of the world’s leading organizations, leveraging a hybrid cloud-first and AI-enabled approach. We help our customers navigate the ecosystem, drawing on decades of experience. Our deployments are powered by leading white box and OEM network, compute, and storage vendors. Our expertise encompasses a wide range of industries and use cases, including enterprise, cloud, data center, AI, 5G/ISP infrastructure, and edge IT.
Humza Atlaf
Network Engineer
Humza is a network engineer at Hardware Nation Labs, where his passion for Open Networking drives his work. With a blend of deep expertise and innovative approaches, he designs robust, scalable networks of the future. His practical experience includes configuring and deploying a range of protocols such as LACP, VLANs, MPLS, and VRRP. At his previous role, he was part of a SONiC testing team, further honing his skills in network setup and troubleshooting. Humza is also adept at network analysis with tools like Wireshark, enhancing his ability to manage complex network environments.
Alex Cronin
Co-Founder and Solutions Architect
Alex Cronin is a seasoned Solutions Architect with over 15 years of experience in networking and disaggregated infrastructure. His career is defined by aligning enterprise technology with business needs across diverse market segments, from emerging startups to Fortune 500 companies. He has worked on digital infrastructure projects covering network design and software solutions for data center operators, service providers, and enterprises. He is continuously collaborating with Hardware Nation Labs R&D to explore and pioneer the latest advancements in open networking and is assessing the applicability of AI/ML technology across enterprise, data center, and service provider infrastructures.